Summary #
Some devices (ex, some copy machines) or software packages (ex, PowerSchool) need to be able to send email, but do not support SMTP authentication. This means they cannot directly use WebMailPRO to send mail since all SMTP connections for outgoing mail need to be authenticated. A workaround for this problem is to setup a relay server at your location that supports authentication.
More Information #
There are many different mail servers and methods to setup a relay server to send mail using SMTP authentication. We are showing how to use one called hMailServer (https://www.hmailserver.com/) . The logic is the same for setting up any other relay servers as well.
- To start, download the latest version of hMailServer from https://www.hmailserver.com/. (At the time this was written, the version that was used was 5.3.3 Build 1879, released 2010-06-07.)
- Run the installer on a server that you plan on keeping up 24×7. hMailServer is a process that runs in the background just like any other server product.
- During the setup wizard, simply choose the default options for everything.
- When the setup asks for a password, choose a secure password. This password is used to access the administrative features of hMailServer.
- When the setup is complete, the Administrator program will ask you to connect to the server to manage.
- On the left pane, navigate to “Settings” -> “Protocols” -> “SMTP”.
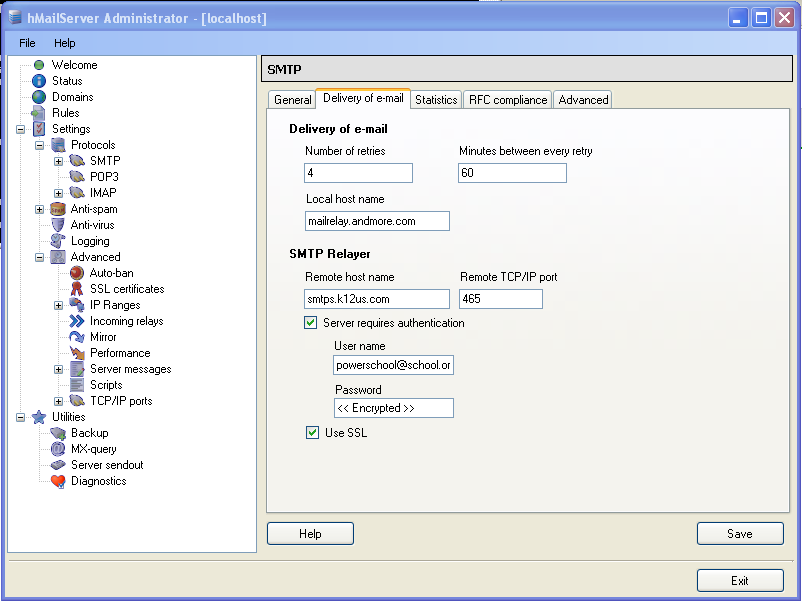
- Go to the “Delivery of m-mail” tab.
- For the “Local hostname” enter a publicly resolvable name for this server. For example, “mailrelay.myschool.edu”. You’ll need to contact your DNS provider to make sure that A record exists in your DNS for your domain, and make sure that the IP address it points to has a reverse DNS entry.
- Under “SMTP Relayer”, fill in the following options:
- Remote Host Name: “smtps.k12us.com”
- Remote TCP/IP Port: “465”
- Server requires authentication: Check the box
- User name: The full email address of the account you created for the relaying. For example, “powerschool@school.org” . To setup an account for POP3 access (what is needed for relaying), see Enabling An Account For POP3 Access.
- Password: The password for that account
- Use SSL: Check the box
- Click on “Save”
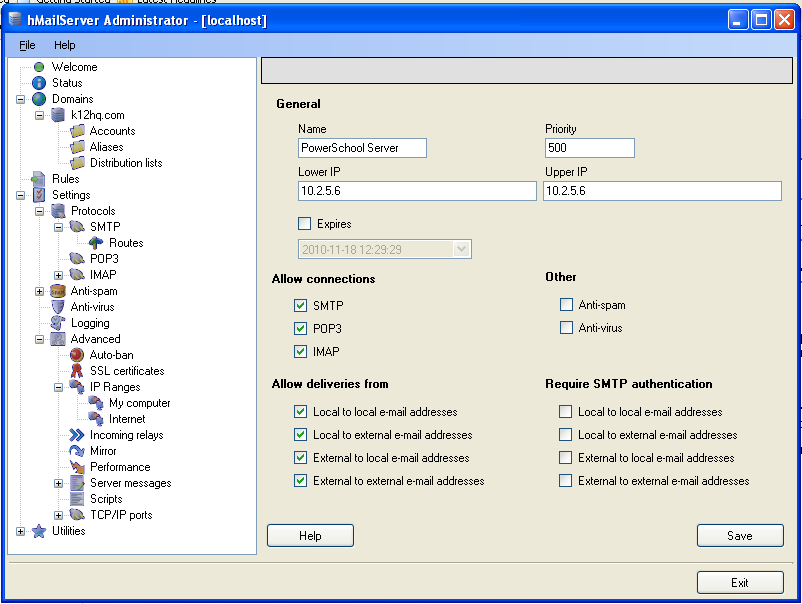
- In the left pane, navigate to “Settings” -> “Advanced” -> “IP Ranges”
- Click on “Add”
- Fill in the form with the following settings:
- Name: Name of the server allowed to relay (for example, “PowerSchool Server”)
- Priority: 500
- Lower IP: IP of server
- Upper IP: IP of server
- Expires: Leave unchecked
- Uncheck both “Anti-spam” and “Anti-virus” under “Other”
- Under “Allow Connections”, check everything
- Under “Allow deliveries from” check, everything
- Under “Require SMTP authentication”, uncheck everything.
- Click on “Save”
- You can now exit the hMailServer Administrator program.
- In your device or software that does not support SMTP authentication, configure the IP address of the server hMailServer is running on as the SMTP server in that device or software. That software will then send mail to the hMailServer anonymously. The hMailServer will then connect to the WebMailPRO SMTP servers using an SSL encrypted session, provide authentication, and then send the mail.
If you need to use the relay for more then one device or software package, repeat step 8 for each device you want to allow relaying for. It is very important you do NOT allow relaying for your entire internal network. This is to prevent a virus infected workstation from spamming “the world” through WebMailPRO. If that happens, your IP addresses will be blocked from accessing WebMailPRO until the problem workstation is found and dealt with.


